Florentina Nicholls
Harlan Butt is an American artist who uses repeated wire patterns in his cloisonné work.
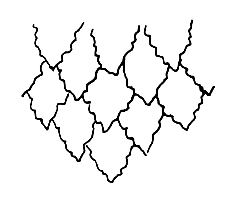
To facilitate manufacturing the precise and uniformly designed wires necessary for his work, Harlan has devised a handy little jig, which repeatedly duplicates his design.
The jig is a combination of wood and 18 gauge brass sheet. He fixes the brass sheet to the wood (description to follow). He then takes a piece of brass, approximately 2½" x 2¼". This is the design piece. He draws his design in the middle of the brass sheet. Using a jeweller's saw, he cuts the piece in half following the outline of his design. When the piece is separated, the upper part of the design is screwed to the top of the brass plate on the wood and the lower part is fixed into a pusher. A piece of wire is put between the two design halves and the form pressed together. By using the jig with its cut pattern, any number of wires can be precisely duplicated very quickly.
Notes from Harlan Butt's workshop at Arrowmont
-
Clean the copper piece as you would for any other enamelling. Any fabrication or riveting must be done before you begin to enamel.
-
Cover the copper with a coat of hard flux and fire.
-
Counter-enamel the piece. Having glass on both sides makes a piece more stable. With cloisonné you need equal amounts of enamel on both sides of the piece. This will keep it from warping.
-
Cover the fluxed side of the piece with silver foil and fire it. By covering it with silver foil you keep the silver wires from collapsing into the copper. If silver wires touch the copper they alloy, but with the foil between the alloying does not happen.
-
Cover the silver foil with silver flux and fire.
-
Glue the shaped wires to the silver side. Dip them in 'Klyrfire', 'Bluestick' or Japanese lily root powder - what ever you use to keep the wires from moving when they are put into the kiln.
-
Fire it so that the wires sink into the enamel.
You are now ready to add colour to your piece.
Michael Benedict
When choosing a tutorial for the Conference one conjures up an image as to what the content will be.
3D Enamelling! What did that convey to me? I have long experimented with producing 3D small flowers, but with little success - so I thought, "this tutorial is for me".
Knowing the work Maureen produces (particularly the bowl made for presentation for the highest Craftsman's award at Conference) I should have been prepared for the demonstration and instruction given. However, I was completely taken by surprise when examples were shown.
After the introduction showing how to produce exquisite bowls, dishes and containers using copper shim, referred to as 5000th.copper sheet, which was pressed and hammered into shape, then enamels were applied in various ways.
Answers to the question in our last issue:
Q: "Can anyone tell me how to draw a thin dark outline, not necessarily black, that will not sink in?"
Tony Stephens
In the 18th century, relatively unskilled craftsmen produced beautifully painted enamels using transfers of images created by highly skilled artists. On reading Susan Benjamin's English Enamel Boxes, I began to wonder whether it might be possible to resurrect the 18th century technique of transferring engraved images to enamel. My motivation was the thought that even my modest engraving skills might produce better artwork than I could produce by free-hand.
At a Region 1 Guild meeting in Edinburgh in Oct 2000, I mentioned to fellow Guild member Brian Moore that I had failed to pick up clean images from engravings. Brian told me that, not only had he been able to replicate the 18th century technique, but thought that it might be possible to produce the same results in a much simpler way, using an inkjet printer. I was instantly intrigued by this idea, for it promised the possibility of using an infinitely wider source of material for artistic inspiration, - the camera, the scanner and the internet. In writing this article I cannot claim any credit for the idea (which is Brian's) or escape criticism for any deficiencies in the execution.